Crafting an inviting outdoor space is both an art and a science, requiring meticulous preparation and careful execution to create a visually stunning and endurable extension of the home.
Porcelain pavers, renowned for their durability and aesthetic appeal, have become the cornerstone for projects ranging from serene pool decks to charming courtyards.
This guide illuminates the path one embarks upon when installing these pavers, detailing each vital step from the ground up, ensuring even a novice installer can achieve a professional-grade outcome.
Embracing the right techniques and materials influences the longevity and beauty of the porcelain paver landscape.
Keep reading to traverse the journey of transforming your outdoor area with precision and confidence.
Key Takeaways
- Proper Ground Preparation and Base Installation Are Imperative for a Successful Porcelain Paver Installation
- The Choice of Installation Method, Whether Sand Bed or Mortar, Affects Both the Durability and Appearance of the Porcelain Pavers
- Precise Placement and the Use of Spacers Are Crucial for Achieving Uniform Gaps and a Harmonious Pattern in the Final Installation
- Post-installation procedures, Including the Application of Grout and Sealant, Contribute Significantly to the Pavers’ Longevity and Aesthetic Appeal
- Regular Maintenance and Care Are Required to Preserve the Integrity and Beauty of Installed Porcelain Pavers
1. Preparing for Installation
Before the installer begins to lay the first porcelain paver, meticulous ground preparation sets the stage for a flawless execution. Ground-level scrutiny ensures a stable foundation, as any significant variability might compromise the interlock and uniformity of the finished area. Excavation, a pivotal initial step, involves removing soil to the required depth to accommodate the layered substructure which includes a sturdy gravel base.
Creating the gravel base constitutes a critical process in the porcelain paver installation guide. The installer compacts the base material using a plate compactor to ensure a solid, undisturbed foundation. The final grading must promote effective water drainage to prevent any pooling or structural weaknesses, especially in applications like pool decks or balconies, where water exposure is common.
Once the base installation is firm, the landscaper may introduce a layer of sand bed or opt for a mortar installation depending on the location and expected foot traffic. The choice of installation method influences not only the durability but also the aesthetic alignment of each porcelain tile as they interlock seamlessly. Proper installation ensures that the expansion joints accommodate natural movements without compromising the surface integrity.
On a leveled sand base or a concrete slab, the installer utilizes spacers to guarantee precise alignment and uniform gaps, preparing for the remaining porcelain pavers to be laid in a harmonious pattern. The use of a rubber mallet assists in gently securing each piece in place, while a spirit level assists in checking that each tile maintains uniform height and alignment with its neighbors, ensuring the surface remains at ground level across the entire installation area.

2. Measuring and Planning the Layout
An installer must approach the task of laying porcelain pavers with precision, beginning with an assessment of the area to determine the quantity of product needed and the layout pattern desired. Accurate measurements are paramount, as these will guide the cutting and placement of each porcelain paver, ensuring the final look is well-proportioned and visually pleasing.
Installers often use guidelines or chalk lines across the base material to maintain straight lines and uniform spacing during the porcelain paver installation. This pre-planning step helps visualize the project’s results, allowing for adjustments before any permanent placement begins.
Diligent mapping out of the area accounts for any potential obstacles, such as edges, walls, or pillars, and plays a crucial role in achieving a seamless porcelain paver installation. The installer may cut pavers using a diamond blade to fit snugly around these impediments, ensuring the integrity of the design.
Lastly, careful consideration of the paver edges complements the installer’s preparatory efforts. Proper placement of an edge restraint fortifies the area’s boundary, safeguarding against shifting and guaranteeing the longevity of the pristine porcelain landscape.
3. Laying the Foundation
As the installer embarks on the base installation, they begin by spreading a uniform layer of gravel. The thickness and particle size are meticulously selected to ensure stability and optimum compaction, laying the groundwork for exceptional durability.
Following the gravel, the constructor typically introduces a layer of fabric to separate the gravel base from the sand bed, which serves to prevent sinking and shifting while enhancing water drainage. This fabric acts as a crucial barrier, safeguarding the integrity of the substratum.
In scenarios where a more solid foundation is necessary, such as driveways, a concrete base may replace the sand bed. The installer will pour and level the concrete, ensuring it’s perfectly horizontal and allowed to cure before proceeding. This concrete slab method is a landmark choice for areas anticipating higher foot traffic and load-bearing demands.
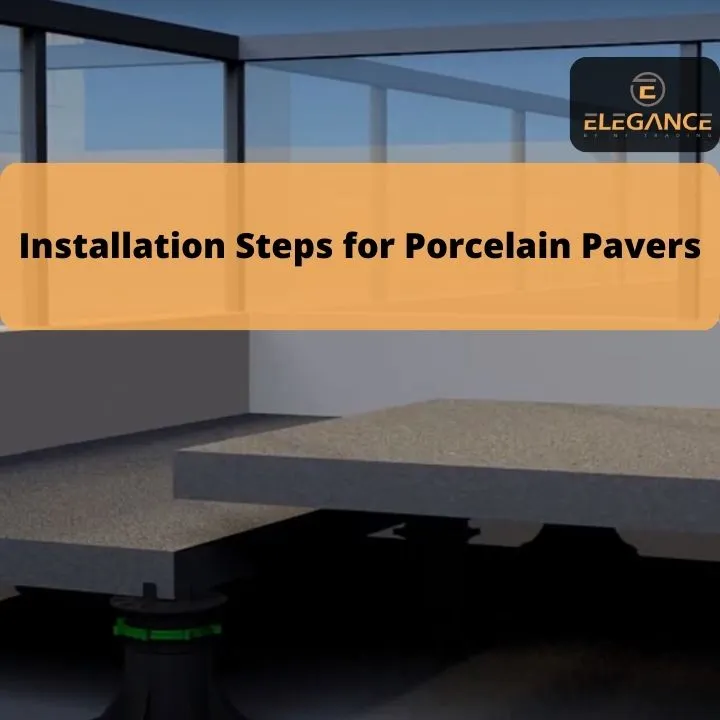
For raised applications, such as roof decks or balconies, a pedestal system is employed to accommodate the porcelain paver installation. This innovative system facilitates easy leveling, supports the pavers, and is known for exceptional water drainage capabilities, enhancing the longevity of both the pavers and the underlying substructures.

4. Cutting and Fitting Porcelain Pavers
Installers begin the precise task of shaping porcelain pavers using a wet saw equipped with a diamond blade. This tool is essential for making accurate cuts, allowing each paver to accommodate the contours of the installation area and any unique design requirements.
During the fitting phase, the installer places each cut porcelain paver onto the prepared base. Attention to detail is critical here, as the installer ensures that each piece sits evenly with its neighbors, maintaining a consistent and level surface.
Adhesive or thin-set is applied with a notched trowel when a mortar installation method is chosen, securing the porcelain pavers to the concrete base. The installer meticulously spreads the adhesive, creating a strong bond between the pavers and the substructure.
The final placements are checked with a spirit level, and adjustments are made where necessary. Installers utilize a rubber mallet to softly tap each porcelain paver into place, providing an even and elegant finish that aligns with the initial plan.
5. Installing the Porcelain Pavers
Upon securing the evenly spread base material, the installer begins placing the porcelain pavers. Each paver is methodically aligned to follow the pre-determined layout, with the aid of spacers to ensure even joint spaces, delivering a consistent and professional finish.
As the porcelain tiles are laid upon the bed of sand or mortar, an installer taps them with a rubber mallet. This action subtly beds each paver into place, achieving a solid bond with the underlying surface and eliminating any minor height discrepancies among the tiles.
Throughout the porcelain paver installation, the use of a spirit level becomes indispensable. The installer constantly checks that each paver maintains the ideal level, ensuring the overall surface remains flush and prevents any uneven foot traffic hazards.
Post-installation, the application of grout between the pavers finalizes the process. The installer carefully fills the joints with a suitable grout product, designed to complement the porcelain pavers and enhance the overall durability of the paved surface.
6. Securing and Grouting the Pavers
Once the pavers are precisely placed, securing them becomes the priority. The installer applies a fine layer of grout, ensuring every crevice between the porcelain pavers is adequately filled. This step not only solidifies the structure but also enhances the finished appearance of the paved area.
The grouting process demands precision; the installer chooses a grout color that complements the tone of the porcelain pavers. They skillfully spread the grout with a trowel, working it into the spaces between the pavers to block any potential ingress of water or debris.
After spreading the grout, cleanup is crucial to prevent haze and to ensure a clean, professional finish. The installer wipes away excess grout with a damp sponge, smoothing it over the pavers to leave a crisp, clean joint:
| Step | Action | Tool | Purpose |
|---|---|---|---|
| 1 | Apply Grout | Trowel | Fill Spaces |
| 2 | Spread Grout | Trowel | Block Water/Debris |
| 3 | Cleanup Excess Grout | Sponge | Prevent Haze |
Once the grout sets, the installer recommends a final inspection to ensure every porcelain paver is secure and the grout has cured correctly. This attention to detail ensures longevity and maintains the aesthetic appeal of the installation area for years to come.
7. Finishing Touches and Clean-Up
As the porcelain paver installation nears completion, an installer’s focus turns to the final touches that will elevate the project to professional standards. Ensuring all porcelain pavers are clean, the installer carefully removes any residual grout, adhesive, or debris that may have accumulated during the installation process.
With the grout and pavers set solidly in place, the next step is an inspection of the entire surface. The installer verifies the level alignment, the precision of the joints, and the overall finish, rectifying any irregularities and confirming the area is poised to handle expected foot traffic.
Following this, the installer may apply a sealant where appropriate, offering additional protection to the porcelain pavers against stains and the elements. This step is more than mere utility; it enhances the color and sheen of the stone, contributing to the character and longevity of the installation:
- Clean any residual grout and adhesive from porcelain pavers.
- Inspect surface alignment, joint precision, and overall finish.
- Rectify any irregularities to ensure area readiness for foot traffic.
- Apply a sealant to provide extra protection and enhance the stone color.
Finally, the installation area is cleared of all tools, spacers, and leftover material. The installer conducts a thorough clean-up, leaving the space immaculate for the client to enjoy. Responsiveness to the client’s feedback and the manufacturer’s instructions ensures successful project completion and steadfast client satisfaction.
8. Maintenance Tips Post-Installation

Post-installation care is integral to preserving the integrity and beauty of newly installed porcelain pavers. Regular cleaning with non-abrasive methods can prevent the build-up of debris and stains on the surface of the pavers.
Protecting the area from harsh chemicals and extreme weather conditions will extend the porcelain pavers’ lifespan. It’s advisable for homeowners to promptly remove any spills or marks to maintain the area’s aesthetic appeal:
- Conduct regular cleaning with gentle products and methods.
- Guard against exposure to potentially damaging chemicals.
- Address spills and stains immediately to prevent lasting damage.
- Take proactive measures to shield the installation from severe weather.
It is recommended to reapply the sealant periodically to enhance the porcelain pavers’ durability against wear and tear. This preventive measure is especially beneficial in high foot traffic areas.
Should any pavers become damaged or compromised over time, a certified installer should be consulted to assess and carry out necessary repairs. Quick and professional attention ensures the longevity and safety of the paved surface.
FAQs for Porcelain Pavers Installation Steps
-
What is the best base for installing porcelain pavers?
The ideal base for porcelain pavers is a well-compacted layer of crushed stone or gravel. This base should be leveled and compacted to provide a stable and even surface. For detailed guidelines on base preparation, visit our installation base guide.
-
Can porcelain pavers be installed over existing concrete?
Porcelain pavers can indeed be installed over existing concrete surfaces, making them a versatile option for many projects. This approach is particularly useful when the concrete is in good condition, without significant cracks or unevenness.
However, it’s important to ensure that the concrete surface is clean and free of any debris or loose material. A key consideration when installing over concrete is drainage; since porcelain pavers are non-porous, it’s crucial to ensure that water can drain off the surface to prevent pooling and slipping hazards.
-
How do you cut porcelain pavers for a custom fit?
Cutting porcelain pavers for a custom fit requires precision and the right tools. A wet saw equipped with a diamond blade is generally the best choice for making clean, straight cuts. Before cutting, measure and mark the paver using a pencil and a square ruler to ensure accuracy. When cutting, it’s important to proceed slowly and steadily to avoid chipping the pavers. Always wear safety goggles and gloves to protect yourself from flying debris. For intricate cuts or curves, a handheld angle grinder with a diamond blade may be used, though this requires a bit more skill and care.
-
What are the key considerations for grouting porcelain pavers?
Grouting porcelain pavers is an important step in the installation process, as it helps to secure the pavers and prevent movement. When choosing a grout, consider the color and texture that will best complement your pavers.
A grout color that contrasts with your pavers can highlight the shape and pattern, while a matching color provides a more seamless look. It’s also important to use grout that is suitable for outdoor conditions, including resistance to moisture and temperature changes. Applying grout evenly and cleaning off any excess promptly will ensure a clean, professional finish.
-
How do I maintain my porcelain pavers after installation?
Maintaining porcelain pavers is relatively straightforward due to their durability and resistance to staining. Regular cleaning with water and a mild detergent are usually sufficient to keep them looking new. Avoid using abrasive cleaners or harsh chemicals that can damage the surface.
For tougher stains, a cleaner specifically designed for porcelain tiles can be used. It’s also a good idea to periodically check the grout and edges of the pavers to ensure they remain secure and intact. In winter, use a plastic shovel for snow removal to avoid scratching the pavers.

Conclusion
In conclusion, adhering to the detailed installation steps for porcelain pavers is key to creating a stable, long-lasting, and visually appealing outdoor area. Each phase of the process, from preparing the ground to laying the foundation and precisely cutting the pavers, demands careful attention and precision.
Utilizing the correct tools and methods, such as a plate compactor for the base and a wet saw for accurate cuts, is essential for a flawless and even finish.
The application of grout not only strengthens the overall structure but also enhances its appearance, while proper sealing ensures enduring protection against the elements. Regular maintenance, including cleaning and timely repairs, is vital to preserve the installation’s integrity over time.
By following these comprehensive installation guidelines, your porcelain pavers will serve as a beautiful and dependable aspect of your outdoor space for many years. To see our range of porcelain pavers and get expert installation advice, we invite you to visit our center. Our team is ready to assist you in selecting and installing the perfect pavers for your project.