In fact, before you begin any hardscaping project, you should first examine the area to determine which tools you will need. No two projects are alike; the required tools will vary based on the pavers, the side of the space, and the existing area on which you are working. Some jobs require cementitious adhesive. Others require sand bedding. And others still necessitate an adjustable pedestal system.
If you have never used them before, paver pedestals may seem like an odd tool. However, they are an essential part of certain installation projects! Today, let’s talk about paver pedestal systems and why you might need them for your next job.
What is a Paver Pedestal System?
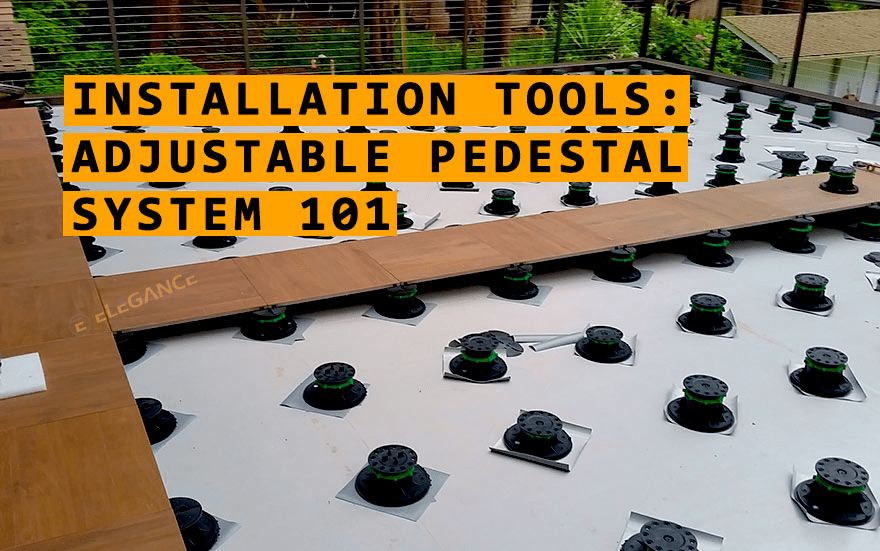
At its core, a paver pedestal is exactly what it sounds like: a pedestal for your paver. Most of the time, hardscapers use these pedestals to put space between porcelain tiles and the existing floor (like a concrete slab). The pedestals keep the tiles from resting directly on the floor, creating a small space between the new floor and the former one.
There are two main reasons why someone would use a paver pedestal system. Firstly, it is a quick and easy way to make your floor completely level. Most pedestal systems are adjustable (like our E7 Elegance model). Therefore, you can set different pedestals at different heights and maintain a level surface across your space. This is particularly useful when the existing floor is warped or sloped.
Secondly, the raised space paver pedestals provide can be useful for certain types of spaces. Paver pedestals are great around swimming pools or water features, as any water the splashes over can drain into space beneath the tiles (and ideally to a drain somewhere on the existing floor). This can prevent water from sitting on the tiles, which can be hazardous and lead to mold or other problems.
Types of Pedestals
Here at Elegance, we offer three main types of paver pedestal. The first (and probably most common) is the adjustable pedestal. This is made from lightweight polypropylene and comes in a variety of sizes, which can be adjusted to achieve a level surface. You can place adjustable pedestals on just about any surface, which makes them a versatile and useful tool for any hardscaper.
The second type of pedestal is the riser. This pedestal is larger than an adjustable one and typically features a square design. Our risers are 1/2” tall, but they do come with 1/16” shims you can use for precise leveling if necessary. The wide design of these pedestals makes them a great choice for areas with lots of foot traffic, as they help absorb shock and protect your pavers over time.
Finally, the last paver pedestal tool we offer is the slope corrector. While this isn’t exactly a pedestal, it is an essential part of your paver pedestal system. This tiny polypropylene disc can help you adjust your pedestals by tiny degrees (as small as 0-5 degrees), which can make a big difference when you’re trying to level out an area.
Do I Really Need It?
The question should not be whether or not you NEED to use paver pedestals; it should be “why wouldn’t you want to?” Paver pedestal systems have many advantages. They are easy to install and easy to remove, should you ever need to do maintenance on your tiles. As we mentioned earlier, they help avoid water entrapment, which can help your tiles last even longer.
Of course, the biggest benefit paver pedestals offer is the ability to control the slope of their existing space. Whether you’re paving an outdoor deck, a garage space, or even the roof of your home, paver pedestals can help you create a perfectly level space on which to work.
How to Use Paver Pedestals
If you are going to use paver pedestals in your hardscaping project, it’s important to know just what you’re doing. Firstly, you need to make sure the existing floor is prepared for the project; make sure there is adequate drainage (if necessary), and that the substrate can support both the pedestals and the pavers. Also make sure to check all the dimensions of your space.
Next, start by placing a pedestal at the point where each grid line meets the perimeter of your space. Try to keep your pedestals as close to the perimeter as possible (ideally no more than 3/16”). Set the pedestal heights so that you have a level of space overall.
From here, you can place a corner of your paver into the pedestal head (there are guides there to help you with installation). Continue to install pedestals at the corner of each paver until you’ve filled in the entire space. You can also add an additional pedestal in the center of each paver for extra support, but this is optional.
Once your space is completely paved, fill in any joints with grout or sand (make sure to use a filler that’s approved for your pedestal type). Just like that, you’ve created a beautiful new paved floor for your space!
Want to Learn More?
At Elegance US, we know how important it is to have high-quality materials for your hardscaping projects. We also know that expert advice can make all the difference throughout your project – which is why we’re happy to help you with both! Our pavers and pedestal systems are always of superior quality, and our team can help you with many of your hardscaping questions.
If you want to learn more about our adjustable pavers (or if you have any other questions for us), please click here to send us a message. We want your project to be the best it can be, and we’ll do everything we can to help.